How to Export a Database in phpMyAdmin

How to Export a Database in phpMyAdmin

Most people export a database in phpMyAdmin for one of three reasons: creating a backup, migrating a website to a new server, or sharing a copy with a developer. Whatever the reason, choosing the correct export settings is what determines whether that database can actually be restored successfully later.

This guide walks through exactly how to export a database in phpMyAdmin, the export methods available, and the settings that matter most.

Before You Start

You’ll need access to phpMyAdmin through your hosting control panel (such as cPanel or Plesk) or a direct phpMyAdmin login URL provided by your host. Make sure you know which database you want to export, especially if your hosting account manages multiple databases.

How to Export a Database in phpMyAdmin

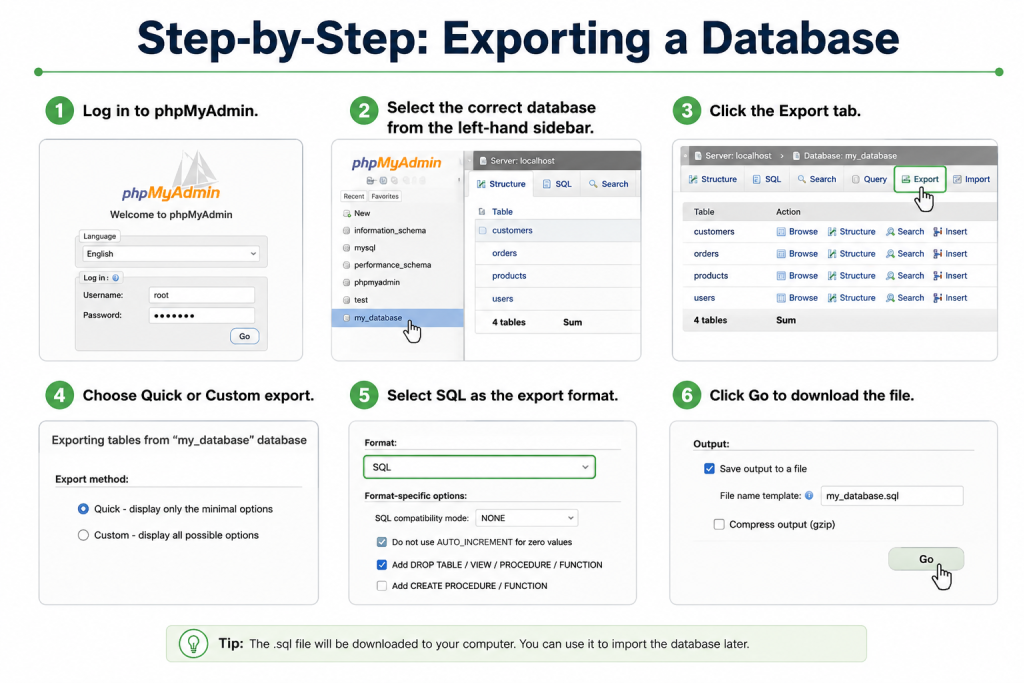
Step-by-Step: Exporting a Database

  1. Log in to phpMyAdmin.
  2. Select the correct database from the left-hand sidebar.
  3. Click the Export tab.
  4. Choose Quick or Custom export.
  5. Select SQL as the export format.
  6. Click Go to download the file.

Quick vs. Custom Export

Quick Export

  • Best for routine, everyday backups
  • Exports the entire database using default settings in one click

Custom Export

  • Export selected tables only, instead of the whole database
  • Export structure only, or structure with data
  • Enable ZIP or GZIP compression
  • Adjust SQL compatibility settings for a different MySQL version

Choosing the Right Export Format

SQL is the recommended format for backups and migrations. It preserves tables, data, indexes, and the overall database structure, so it can be imported directly into another MySQL or MariaDB database. Other formats, such as CSV or JSON, are intended for exchanging data with spreadsheets or other applications — not for a complete database restore, since they don’t retain structure or relationships between tables.

Handling Large Databases

Large databases can exceed browser or server execution limits during export. To avoid this:

  • Use ZIP or GZIP compression to reduce the file size.
  • If the export still times out, ask your hosting provider about exporting via SSH with mysqldump, which handles large databases more reliably than a browser-based export.
  • Most hosting environments support importing compressed SQL files directly, so compression doesn’t add extra steps when restoring later.

Common Mistakes to Avoid

  • Exporting the wrong database.
  • Exporting only the structure when the data is also needed (or vice versa).
  • Forgetting to compress large exports.
  • Not checking that the SQL file downloaded completely.
  • Overwriting previous backups without keeping older copies.

Verifying Your Backup

Once the export finishes, it’s worth taking a moment to confirm the file is actually usable:

  • Confirm the SQL file downloaded successfully.
  • Check the file size looks complete rather than unusually small.
  • Store copies in more than one secure location, such as local and cloud storage.
  • Use date-based filenames so backups are easy to identify later.

Final Thoughts

A Quick SQL export is sufficient for most day-to-day backups, while Custom export gives you the extra control needed for migrations and more advanced database management. Whichever method you use, exporting your database regularly is a core part of keeping a reliable backup strategy in place.

The author
Asher Feroze

I’m Asher Feroze, and I’ve been part of CreativeON for several years, working in various roles including Manager Operations, Business Development Manager, and technical support for our web hosting services. Over time, I’ve gained deep insights into both the business and technical sides of the industry. Now, I use that experience to write informative articles for CreativeON, Gworkspace, and gworkspacepartner.pk, helping readers make smart choices when it comes to web hosting and Google Workspace solutions.

Table of Contents