How to Schedule a WordPress Post: A Step-by-Step Guide
Scheduling WordPress posts allows you to prepare articles in advance and publish them automatically at a specific date and time. Instead of manually publishing every article, you can plan your content calendar and maintain a consistent publishing schedule. Whether you manage a business blog, publish tutorials, or run a content-focused website, WordPress post scheduling can […]
Scheduling WordPress posts allows you to prepare articles in advance and publish them automatically at a specific date and time. Instead of manually publishing every article, you can plan your content calendar and maintain a consistent publishing schedule.
Whether you manage a business blog, publish tutorials, or run a content-focused website, WordPress post scheduling can make content management easier.
WordPress includes a built-in scheduling feature in both the Block Editor and Classic Editor. You do not need an additional plugin to schedule regular blog posts.
In this guide, you’ll learn how to schedule a WordPress post, manage scheduled articles, change publication dates, cancel scheduled posts, and fix common scheduling problems.
Why Schedule Posts in WordPress?
Scheduling allows you to prepare blog posts in advance and publish them automatically at your preferred time.
Instead of logging in whenever an article needs to go live, you can prepare several posts and assign each one a different publication date.
Here are some practical benefits:
- Consistent publishing: Maintain a regular publishing schedule without manually publishing every article.
- Better content planning: Prepare articles ahead of product launches, marketing campaigns, and seasonal events.
- Time management: Write and schedule multiple articles during one working session.
- Team coordination: Allow content managers and editors to plan upcoming publications.
- Flexible publishing: Choose publication dates and times that suit your editorial calendar.
For example, a business publishing three articles every week can prepare them on Monday and schedule them for Wednesday, Friday, and Sunday.
How to Schedule a WordPress Post Using the Block Editor
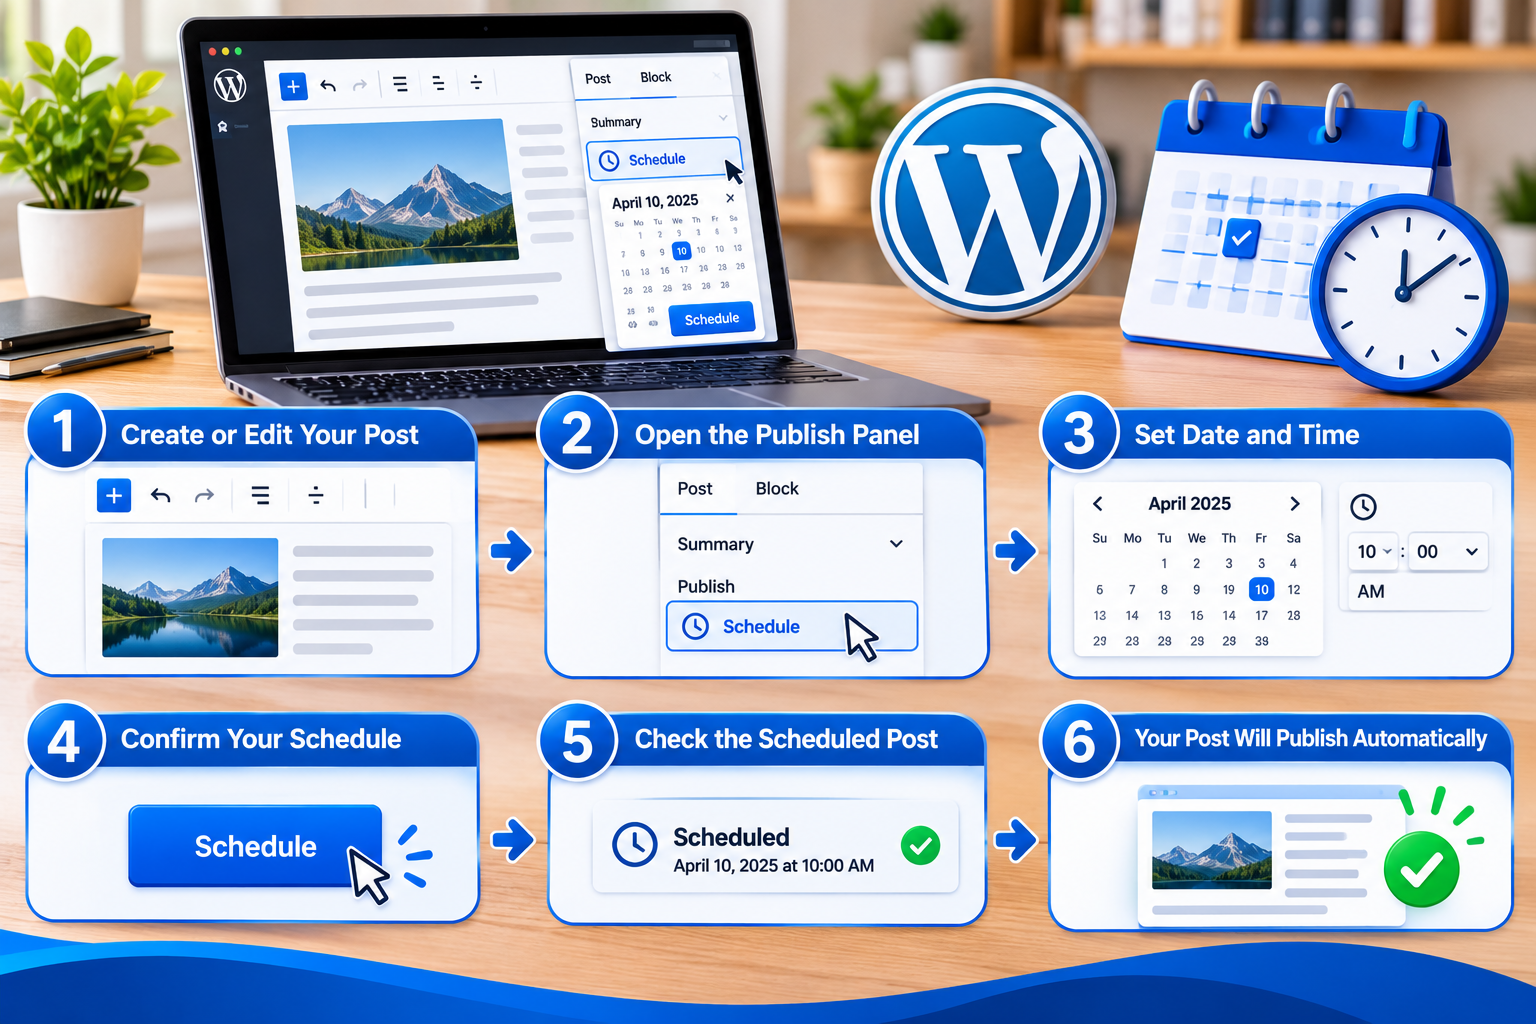
The WordPress Block Editor (Gutenberg) includes a built-in scheduling option. Follow these steps to schedule your article.
Step 1: Open Your WordPress Post
Log in to your WordPress dashboard.
Navigate to:
Posts → Add New Post
If you have already written your article, go to Posts → All Posts and open the post you want to schedule.
Write your content, add images, select categories, and complete any other necessary editing before scheduling.
Step 2: Open the Publishing Settings
In the Block Editor, locate the Settings sidebar in the upper-right corner.
If the sidebar is hidden, click the Settings icon to display it.
Under the Post settings, locate the Publish option. For a new post, this normally displays an immediate publication setting.
Click the publication date or the option showing when the post will be published.
Step 3: Select a Future Date and Time
A date and time selector will appear.
Choose the future date and publication time for your article.
For example:
- Publication date: November 10, 2026
- Publication time: 10:00 AM
Make sure the selected date is in the future and that your WordPress website uses the correct time zone.
After selecting the date and time, close the date selector.
Step 4: Schedule Your WordPress Post
Once you select a future publication date, the Publish button will change to Schedule.
Click Schedule to confirm.
Depending on your WordPress version, you may see a confirmation step before the scheduling action is completed.
After confirmation, WordPress saves your article with a Scheduled status.
You can now find it under Posts → All Posts → Scheduled.
How to Schedule a WordPress Post in the Classic Editor
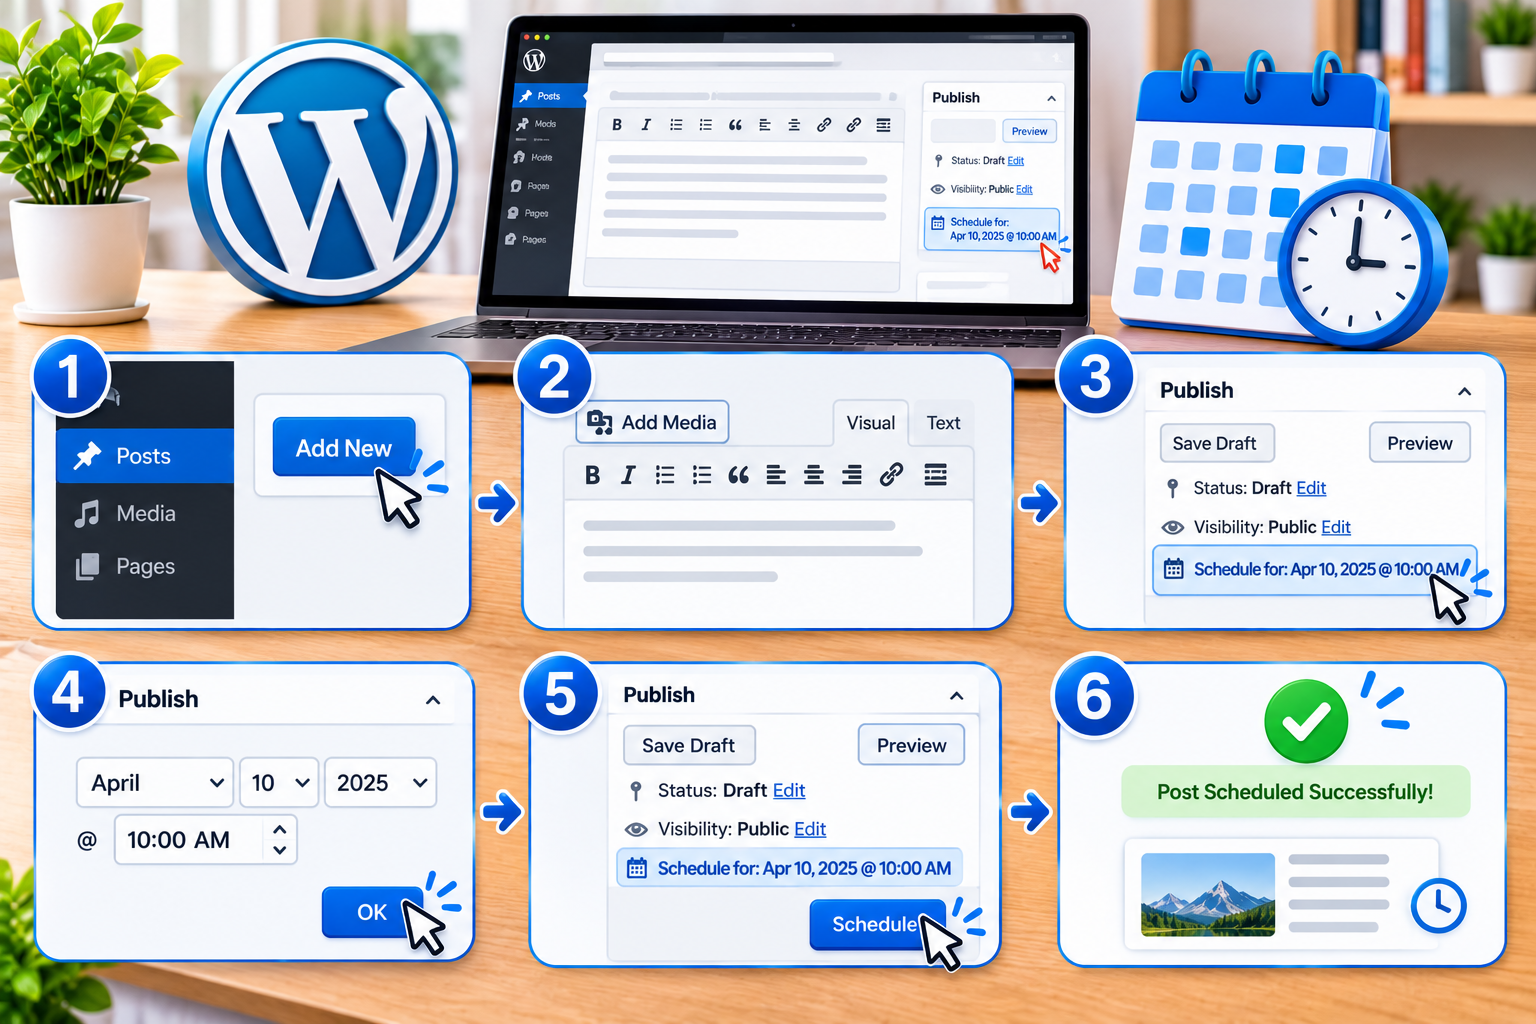
If your website uses the Classic Editor instead of Gutenberg, you can schedule posts through the traditional Publish settings.
Follow these steps:
- Open your WordPress dashboard.
- Navigate to Posts → Add New.
- Write your article and add the required images.
- Locate the Publish box on the right side of the editor.
- Find the Publish immediately option.
- Click Edit next to it.
- Enter your desired publication date and time.
- Click OK to confirm the scheduling details.
- Select the Schedule button.
Your article will now be scheduled for automatic publication.
How to View and Manage Scheduled WordPress Posts
After scheduling an article, you may want to review its publication date or make changes before it goes live.
WordPress provides a Scheduled filter to help you find upcoming articles.
To view your scheduled posts:
- Open your WordPress dashboard.
- Navigate to Posts → All Posts.
- Locate the post status filters above the article list.
- Click Scheduled.
- Review your upcoming articles and their publication dates.
From this screen, you can open any scheduled article to:
- Edit its title and content.
- Update its featured image.
- Change its publication date.
- Correct spelling and formatting mistakes.
- Review the article before publication.
This is particularly useful when managing an editorial calendar with multiple upcoming articles.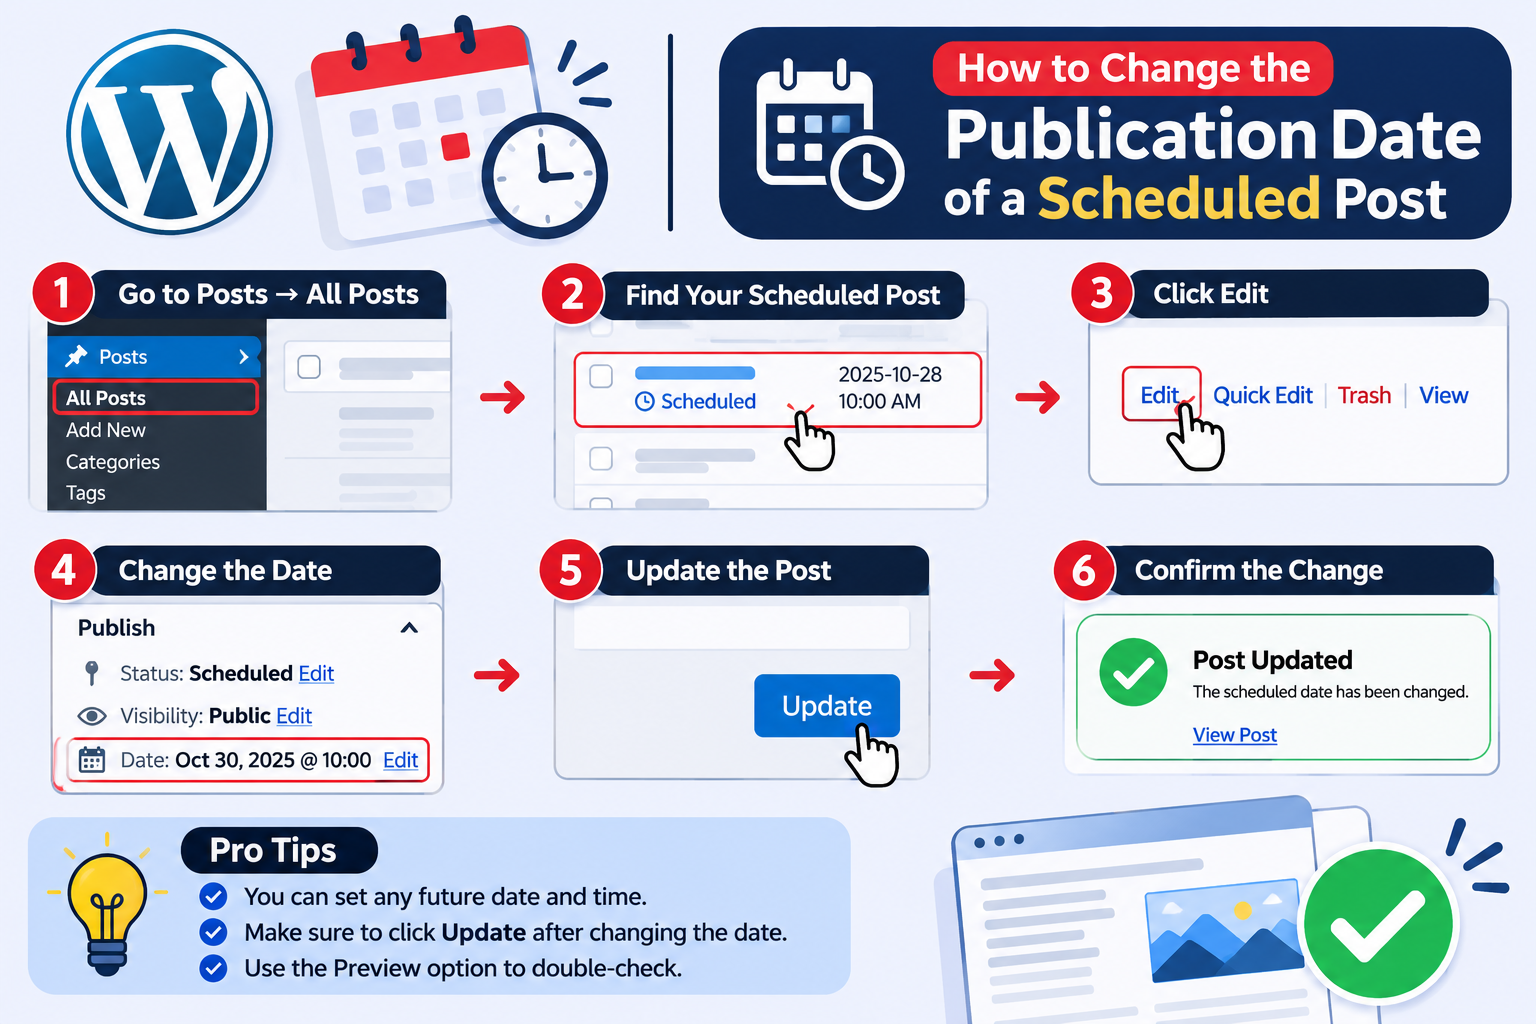
How to Change the Publication Date of a Scheduled Post
Sometimes you may need to delay an article or publish it earlier than originally planned.
You can change the scheduled publication date without creating a new post.
Follow these steps:
- Go to Posts → All Posts → Scheduled.
- Open the article you want to modify.
- Locate the publication date in the Post settings.
- Click the date and time option.
- Select the new publication date and time.
- Click Update or save the scheduling changes, depending on your WordPress interface.
Check the article’s status afterward to make sure it remains scheduled.
If you want to publish the article immediately, use the publication setting to change its scheduled time to the present and complete the publishing action.
How to Unschedule a WordPress Post
If you no longer want an article to publish automatically, you can cancel its scheduled status.
The simplest option is to return the scheduled post to Draft.
Follow these steps:
- Navigate to Posts → All Posts → Scheduled.
- Open the article you want to unschedule.
- Find the post status or scheduling options.
- Select Switch to draft.
- Confirm the action if WordPress requests confirmation.
The article will return to Draft status and will no longer publish automatically.
Important: Changing the publication date to another future date does not unschedule a post. It simply postpones its publication. To cancel automatic publication, change the post back to Draft.
What Happens After You Schedule a WordPress Post?
After you click Schedule, WordPress saves the article and registers a scheduled publishing task.
Here is what happens next:
- The article receives a Scheduled status.
- It remains unpublished until the scheduled publication time.
- WordPress’s scheduling system checks for tasks that need to run.
- When the scheduled task executes successfully, the article becomes Published.
- The article becomes publicly accessible according to its visibility settings.
WordPress normally uses WP-Cron to execute scheduled tasks. This system is responsible for triggering publishing activities and other background tasks.
If the scheduling system does not run on time, an article may remain scheduled even after its intended publication time.
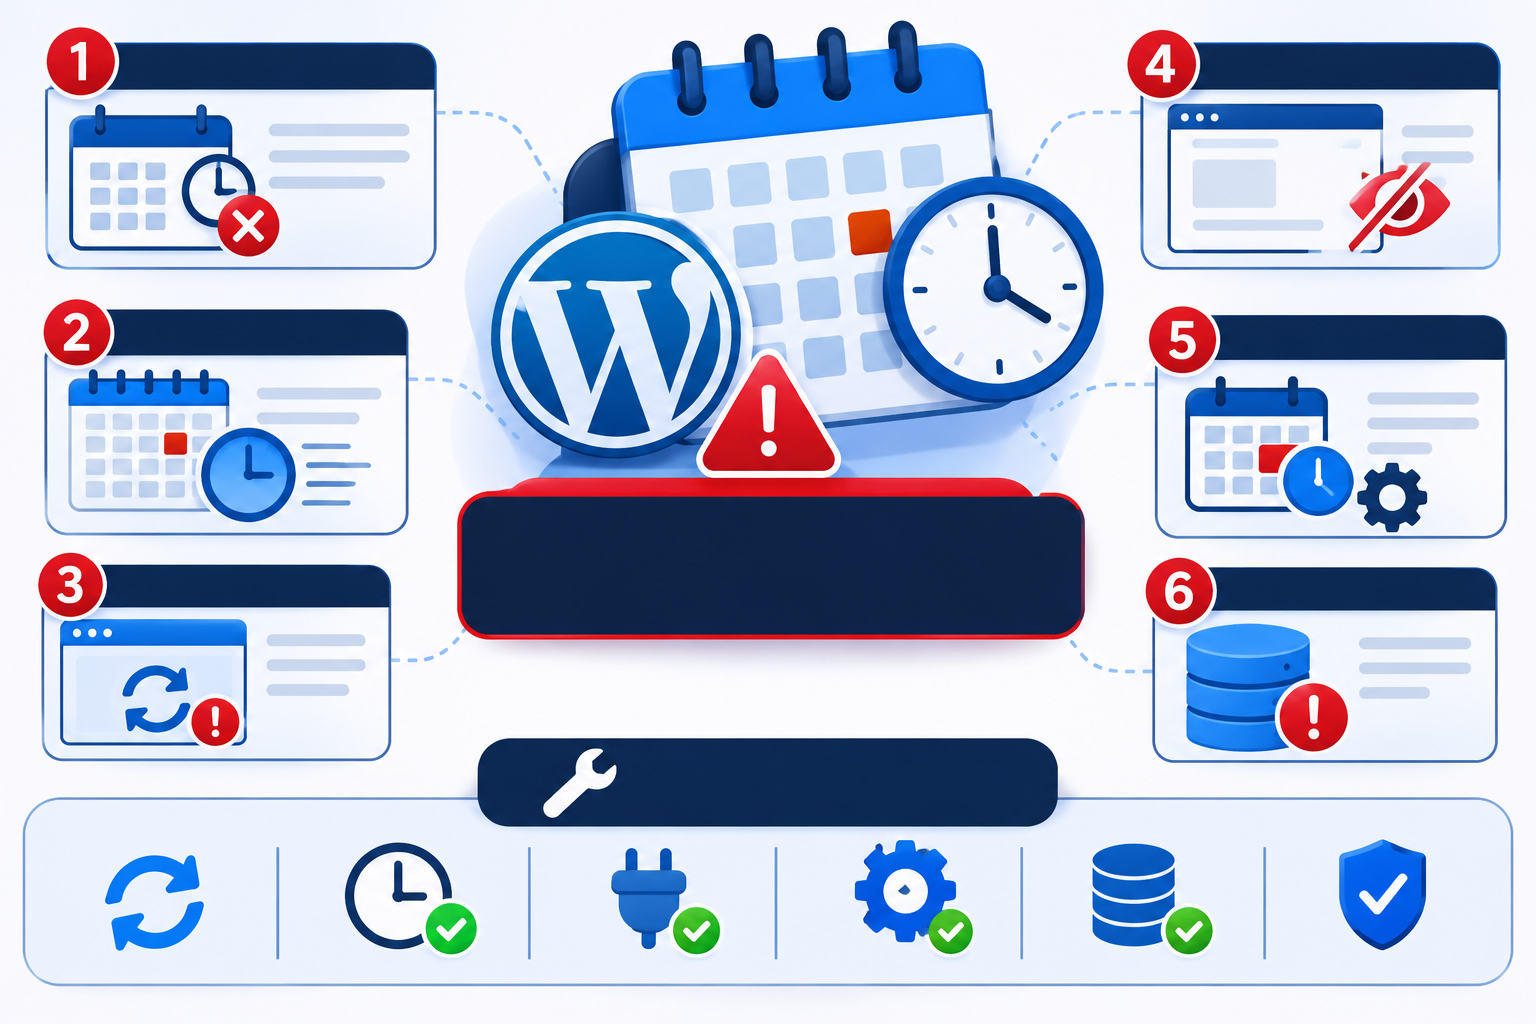
Common WordPress Post Scheduling Problems
Although WordPress makes scheduling straightforward, scheduled articles do not always publish at the expected time.
Here are some common problems and their possible solutions.
1. WordPress Missed Schedule Error
The WordPress missed schedule error occurs when a scheduled post fails to publish at its intended time.
WordPress normally relies on WP-Cron to trigger scheduled tasks. Unlike a traditional server cron job, WP-Cron is generally triggered by website requests.
For example:
- You schedule an article for 10:00 AM.
- Nobody visits your website around that time.
- The scheduled publishing task may not execute immediately.
- A later website request may trigger the overdue task.
Low website traffic, failed loopback requests, server issues, or incorrect cron configuration can contribute to scheduling delays.
Possible solutions:
- Check whether WP-Cron is functioning correctly.
- Review WordPress Site Health for loopback request problems.
- Check whether WP-Cron has been disabled.
- Review recently installed or updated plugins.
- Ask your hosting provider to inspect server logs and cron configuration.
- Consider configuring a real server cron job to trigger WordPress scheduled tasks regularly.
A server-side cron job can provide more predictable execution, particularly for business websites that require reliable scheduled publishing.
2. Incorrect WordPress Time Zone
Your article may publish earlier or later than expected if your WordPress time zone is incorrectly configured.
WordPress uses the time zone configured in its General Settings rather than relying on each visitor’s computer clock.
To check your time zone:
- Open Settings → General.
- Find the Timezone option.
- Select the appropriate city or UTC offset.
- Save your changes.
For websites targeting different markets, use the appropriate local time zone:
- Pakistan: Asia/Karachi (UTC+5)
- UAE: Asia/Dubai (UTC+4)
This helps ensure that scheduled articles follow your intended publishing calendar.
3. Scheduled Posts Are Not Publishing Automatically
If multiple scheduled articles fail to publish, the issue may involve WP-Cron, server configuration, plugin conflicts, or failed background requests.
Try these troubleshooting steps:
- Check whether WP-Cron is disabled in your WordPress configuration.
- Review WordPress Site Health for loopback request errors.
- Temporarily investigate recently installed plugins that may interfere with scheduled tasks.
- Check server error logs for relevant errors.
- Ask your hosting provider to verify cron execution and server configuration.
If the problem continues, consider configuring a server-side cron job with assistance from your hosting provider.
Avoid editing WordPress configuration files or changing cron settings unless you understand their impact or have appropriate technical support.
Best Practices for Scheduling WordPress Posts
Following a few simple practices can help you manage scheduled articles more effectively.
- Create a publishing calendar: Decide which articles should be published each week.
- Review articles before scheduling: Check spelling, formatting, internal links, and featured images.
- Check your time zone: Make sure your WordPress website uses the correct local time.
- Space out publications: Schedule articles according to your editorial plan rather than publishing everything simultaneously.
- Monitor scheduled posts: Periodically verify that upcoming articles have the correct publication dates.
- Keep WordPress updated: Maintain compatible WordPress core, themes, and plugins.
- Monitor scheduling reliability: Investigate repeated missed schedules instead of assuming WordPress will always publish on time.
If your website publishes content regularly, maintaining an editorial calendar can help you track upcoming articles and publication dates.